How to clean a shower: glass, tile, grout and mould
Clean shower glass, tile and grout with a detailed sequence, material-specific product choices and practical advice for buildup, persistent marks and mould.

What should you identify before cleaning a shower?
List every material the cleaner could touch, including adjacent trim and the shower floor.
A shower often combines several finishes within a few centimetres. A spray aimed at glass can run onto a stone threshold, and a grout-cleaning product can touch a plated drain. Walk around the enclosure before opening a bottle. Note the glass treatment, wall and floor material, grout, flexible sealant and fixtures.
Find the care information from the installer or manufacturer. A stone-look tile is not proof of natural stone, and an apparently plain glass panel may have a coating. Where the material is unknown, pause the chemical treatment and ask rather than testing several cleaners across the whole enclosure.
Decide what you are trying to remove
Describe the appearance without assuming a diagnosis: a loose hair at the drain, a greasy film near a soap shelf, a chalky-looking patch on glass or a dark mark in sealant. Photograph persistent marks before cleaning. This gives you a reference and makes it easier to explain what remains after the surface dries.
Set aside separate soft tools for the glass, joints and floor, plus a drying cloth. Avoid carrying grit from the shower floor onto a glass door. Inspect tools before use and replace a pad that has trapped hard debris.
Which shower-cleaning products should you choose?
Choose for the material and the residue together; a stronger descaler is not a universal bathroom cleaner.
Swipe or scroll to see all columns →
| Product type or example | Where it may fit | Limits and precautions |
|---|---|---|
| A mild cleaner approved by the enclosure manufacturer | Routine residue on the named washable surfaces. | Check dilution and rinse directions; more concentrate does not mean a better finish. |
| Granite Gold Shower Cleaner | A manufacturer example formulated for specified natural-stone and ceramic shower surfaces. | Check the bottle and stone-care instructions; do not assume it is approved for every glass coating or adjacent finish. |
| A glass-care product approved for your door | The glass surface named in its instructions. | Coated glass may have different restrictions from ordinary glass. |
| A compatible limescale remover | Confirmed mineral deposits on an acid-tolerant surface, when explicitly permitted. | Protect neighbouring stone, grout and metal. Never combine it with bleach or another cleaner. |
The Natural Stone Institute recommends appropriate neutral cleaning and warns that acids can etch susceptible stone. A sealed stone surface still needs compatible care. Kohler specifically warns against abrasive cleaners on CleanCoat glass. These are separate material rules, so a single “bathroom safe” claim is not enough.
How do you check whether a product could be harmful?
Read the back label for excluded surfaces, eye or skin warnings, required protection, contact time and rinsing. Follow the listed ventilation precautions. Never mix bleach with an acidic descaler or ammonia; hazardous gases can result. Health Canada’s chemical-safety guidance explains these risks.
A concealed test, where the surface manufacturer allows one, checks appearance only. It does not prove that a product is harmless to breathe or touch. The named cleaner is an illustrative option, not a statement that Heron used it in the photograph below.
How do you clean a shower thoroughly, step by step?
Clear the enclosure, address each material with its allowed method, then check the result after drying.
1. Make the surfaces accessible
Remove bottles, mats and loose accessories. Check the undersides of items before returning them later. Collect reachable hair and loose debris without dismantling a drain. Place supplies outside the wet walking area and make sure you have stable access; never stand on a slippery tub edge to reach higher glass.
2. Start with one small section
Choose the permitted product for that surface and read its full directions before applying it. Work on an area you can finish within the stated conditions. Use any required contact time rather than immediately scrubbing the product away, but do not invent a longer soak. Follow the label if it says the surface must remain wet or must not be allowed to dry.
3. Clean glass without transferring grit
Use the door’s approved soft cloth or tool. Work around the perimeter and lower edge as well as the centre panel. Keep abrasive powders, scouring pads and improvised blades away from coated glass. Finish according to the cleaner and enclosure instructions, then inspect the dry panel from both sides; a mark on the other face can look like a missed spot.
4. Give joints and corners separate attention
Use a permitted soft brush or cloth on accessible joints. Look at the soap shelf edge, wall-to-floor meeting point and around fixtures. Keep pressure controlled. Loose grout, lifting sealant or a crack is a repair issue: stop working that area and document it rather than trying to scrub it smooth.
5. Finish the shower floor and fittings
Keep the floor tool separate from the glass cloth. Address reachable residue around the drain cover without removing plumbing parts. Follow the finish-specific rules on taps, handles and trim. Complete the required rinse or wipe-off step. Remove cleaning residue from walking surfaces and let the area dry before normal use.
6. Inspect before putting everything back
Compare the dry result with your original observations. Check for remaining film, product residue and any area that stays damp. Return only clean items. Record a stubborn mark with its location, material and product used; that is more useful than repeatedly treating the whole enclosure.
This checklist organises the work. The exact application and finishing method still comes from the cleaner label and the surface instructions. For example, some products specify rinsing, while others specify wiping dry.
Why do shower glass or grout still look marked?
A remaining mark can be residue, mineral buildup or damage; identify it before changing products.
Swipe or scroll to see all columns →
| What remains | What to check | Useful response |
|---|---|---|
| A broad smeary film | Cloth cleanliness and whether the finish step was completed. | Use the allowed rinse or wipe-off method with a fresh tool. |
| A fixed cloudy area on glass or stone | Does it remain unchanged after a compatible clean? | Ask the manufacturer about deposits versus etching or coating damage. |
| Discoloured sealant or loose grout | Is the material intact, or is moisture continuing behind it? | Arrange assessment or repair; appearance alone does not identify the cause. |
| The same damp patch or suspected mould returns | Ventilation, leaks and water damage. | Investigate the moisture source instead of increasing chemical strength. |
Be realistic about what cleaning can change. A clean shower does not need to look newly installed for the cleaning to be complete. The practical finish line is removal of the agreed reachable residue, correct product removal and a clear record of any issue that needs another trade.
What should you do if the shower has mould?
Check its extent and the moisture source before deciding whether a small surface cleanup is appropriate.
Health Canada describes small areas as up to three patches totalling less than one square metre. Its guidance for suitable hard surfaces uses water and unscented dish detergent, followed by drying, rather than bleach. It specifies gloves, goggles and a well-fitting N95, with vulnerable people and pets kept away.
Read the full Health Canada mould guidance first. Larger, hidden or returning growth and water damage need professional assessment. Correct leaks or persistent moisture. Ordinary Heron bathroom cleaning does not include mould remediation.
After normal shower use, maintain the bathroom’s ventilation and remove accessible surface water using tools approved for the enclosure. If the same area stays wet after the rest dries, make that location part of the moisture investigation.
What does a real Heron shower clean look like?
This original before-and-after comparison shows the visible result on a tiled shower floor cleaned by Heron.
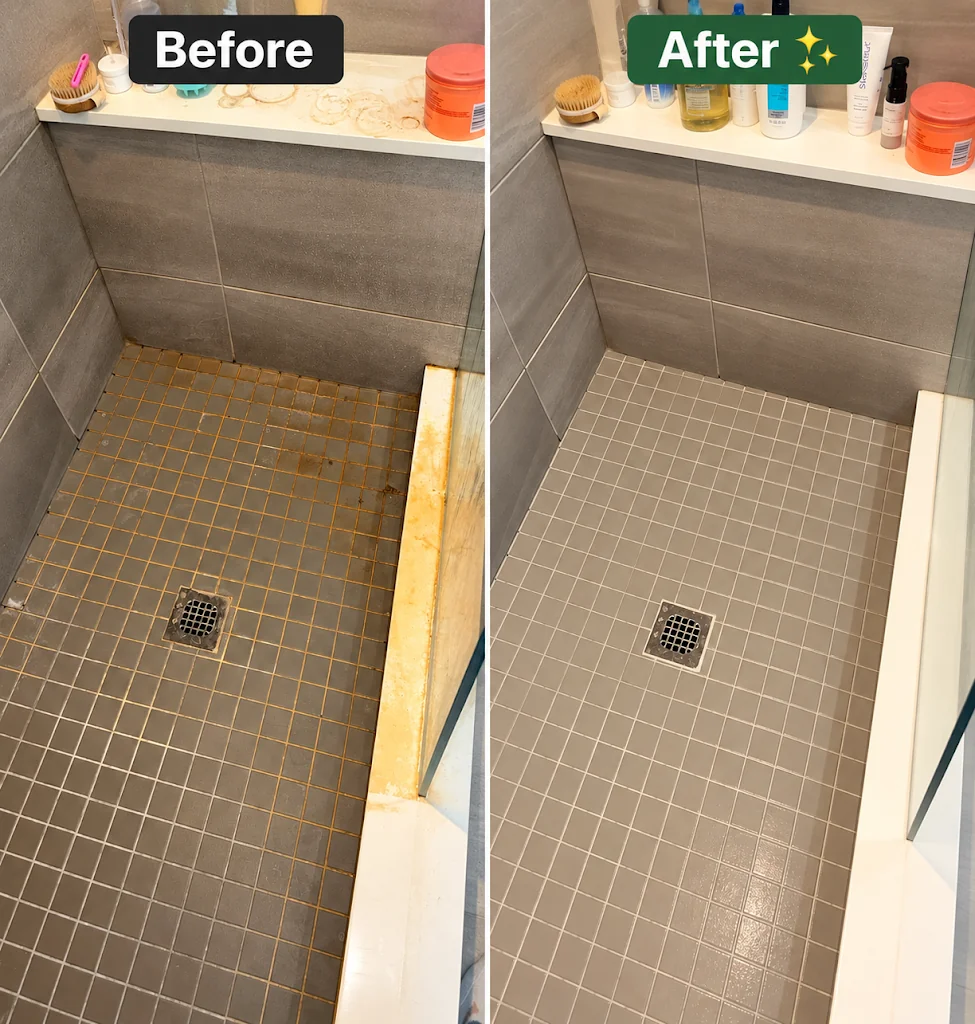
A shower floor has detail beyond its central open area: edges, joints and the space around the drain deserve attention when agreeing the work. This photo documents the surface result. It does not establish a repair or identify a particular residue as mould.
See another genuine work example in our detailed fridge-exterior clean, finished with stainless-steel wipes. To plan a bathroom alongside the rest of the home, use the room-by-room Deep-cleaning checklist.
How can Heron help with the surrounding home cleaning?
Confirm the rooms, reachable surfaces and selected tasks before booking.
For bathroom cleaning, describe the glass, tile or stone, where buildup is concentrated and any damaged grout or sealant. That gives the team a useful starting point for the agreed work. A bathroom within a Deep clean still needs surface-specific care; repair and mould remediation are separate services.
If bathroom buildup is part of a larger reset, explore Deep cleaning in Burlington, Deep cleaning in Mississauga or Deep cleaning in Hamilton. Describe the shower materials and the work you need when requesting the quote; a city service page does not change the care limits for stone, grout or sealant.
Check all service areas and nearby communities to find your address’s coverage.
Shower cleaning questions
Can I use vinegar on every shower?
No. Acid can damage susceptible stone and may conflict with other surface-care instructions. Identify the glass treatment, stone or tile, grout and nearby fittings before choosing a product.
Which cleaner should I use for a marble shower?
Choose a product explicitly approved for that stone and its finish. A stone-specific shower cleaner is a possible category; ordinary acidic limescale removers are not interchangeable with it.
Can I mix bleach and shower descaler?
No. Never combine cleaning products. Bleach mixed with an acidic cleaner can release hazardous gas. Follow the individual label and Health Canada guidance.
How long should shower cleaner sit?
Use the exact product’s contact time and surface restrictions. Do not choose an arbitrary ten-minute soak or let a product dry when its directions prohibit that.
Will a stronger cleaner remove cloudy glass?
Not necessarily. Remaining cloudiness may be deposits, residue or damage. After a compatible clean, ask the enclosure manufacturer before escalating the treatment.
Is a before-and-after photo proof that mould was removed?
No. A photo shows appearance; it does not identify the substance or establish that a moisture problem has been corrected.
Does Deep cleaning repair grout or sealant?
No. Flag loose grout, failed sealant, leaks and damaged finishes before the visit. Cleaning and repair require different work.
How can I keep the shower easier to clean?
Use the enclosure’s approved drying tool after use, maintain ventilation and keep reachable shelves and edges clear. Investigate persistent dampness rather than allowing the same area to remain wet.
Which care guide should you read next?
Use the method for the actual material or appliance you are cleaning.
Where can I book help with these cleaning tasks?
Find cleaning help for the tasks covered here. For preparation and booking details, see Springdale cleaning in Brampton or Corktown cleaning in Hamilton. Each guide explains local access planning and how to choose the requested rooms and extras.
Sources
Care guidance checked October 19, 2026. Use the instructions for your exact material, appliance and product.
Heron’s rate card 2026-11-11 defines selected household tasks.